How To Add Contact Form (Contact Us Page) in Blogger?
Contact us page is very
important for bloggers who use it as a platform for business websites. Firstly
it gives a professional look to a website. And it makes visitors readers to
contact the owner personally instead of comment section.
Nowadays most of the blogspot
bloggers seek the help of third-party site to make a contact us form. But today
you are going to learn the official way to add contact us page in Blogger.
I have divided this tutorial
in three parts so you can understand it easily.
Firstly we learn how to add
contact gadget. Secondly we learn to hide it and in the end we learn to implement
the official code in a page.
Part 1 : Addition of Contact Gadget.
To add the contact us gadget
follow the instructions given below
Step 1 :
firstly visit blogger.com and login into your account
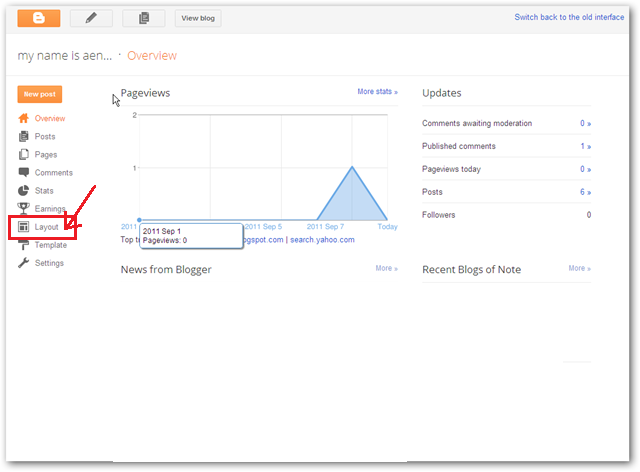
Step 2 :
Click on layout from the left sidebar to get an option to add gadgets.
Step 3:
you will see “add a gadget” in the main panel on the right side. Clicking on it
will bring you to a list of gadgets.
Part 2 : Hiding the Gadget
Now that we have added the contact form to one
of the region in the layout, we need to hide it so that it is not visible in
the widget area but in a page. To do so follow instruction given below
Step 1 :
go to theme section and simply click on edit HTML. You will see whole code of
your blog in a large field.
Step 2:
search for ]]></b:skin> and place the following code just before it.
|
#contact form1 {
Display: none !important;
}
|
Then click
on save theme. After that you won’t see contact widget on your blog.
Part 3 : Displaying contact us on a
Blogger page:
Once we have the contact form widget added and
hidden, let's create a Blogger contact us page.
Step 1 : From the Blogger
Dashboard, click on "Pages" and go to add a new page
Step 2 : Give a title to the page
such as "Contact" or "Contact Us" etc.
Step 3 : Click on HTML button next
to COMPOSE to enter in HTML mode
Step 4 : If there are any default
code, select all and remove.
Step 5 : Copy and paste the following code in the HTML text
area.
<div id=”custom_ContactForm1″ class=”widget ContactForm”>
<div class=”contact-form-widget”>
<p>Get in touch with us by filling out the form below.</p>
<div class=”form”>
<form name=”contact-form”>
<p></p>
Name
<br>
<input type=”text” value=”” size=”30″ name=”name” id=”ContactForm1_contact-form-name” class=”contact-form-name”>
<p></p>
Email
<span style=”font-weight: bolder;”>*</span>
<br>
<input type=”text” value=”” size=”30″ name=”email” id=”ContactForm1_contact-form-email” class=”contact-form-email”>
<p></p>
Message
<span style=”font-weight: bolder;”>*</span>
<br>
<textarea rows=”5″ name=”email-message” id=”ContactForm1_contact-form-email-message” cols=”25″ class=”contact-form-email-message”></textarea>
<p></p>
<input type=”button” value=”Send” id=”ContactForm1_contact-form-submit” class=”contact-form-button contact-form-button-submit”>
<p></p>
<div style=”text-align: center; max-width: 222px; width: 100%”>
<p id=”ContactForm1_contact-form-error-message” class=”contact-form-error-message”></p>
<p id=”ContactForm1_contact-form-success-message” class=”contact-form-success-message”></p>
</div>
</form>
</div>
</div>
<div class=”clear”></div>
<span class=”widget-item-control”>
<span class=”item-control blog-admin”>
<a title=”Edit” target=”configContactForm1″ onclick=”return _WidgetManager._PopupConfig(document.getElementById(“ContactForm1″));” href=”//www.blogger.com/rearrange?blogID=8799058979810298021&widgetType=ContactForm&widgetId=ContactForm1&action=editWidget§ionId=sidebar-right-1″ class=”quickedit”>
<img width=”18″ height=”18″ src=”//img1.blogblog.com/img/icon18_wrench_allbkg.png” alt=””>
</a>
</span>
</span>
<div class=”clear”></div>
</div>
<div class=”contact-form-widget”>
<p>Get in touch with us by filling out the form below.</p>
<div class=”form”>
<form name=”contact-form”>
<p></p>
Name
<br>
<input type=”text” value=”” size=”30″ name=”name” id=”ContactForm1_contact-form-name” class=”contact-form-name”>
<p></p>
<span style=”font-weight: bolder;”>*</span>
<br>
<input type=”text” value=”” size=”30″ name=”email” id=”ContactForm1_contact-form-email” class=”contact-form-email”>
<p></p>
Message
<span style=”font-weight: bolder;”>*</span>
<br>
<textarea rows=”5″ name=”email-message” id=”ContactForm1_contact-form-email-message” cols=”25″ class=”contact-form-email-message”></textarea>
<p></p>
<input type=”button” value=”Send” id=”ContactForm1_contact-form-submit” class=”contact-form-button contact-form-button-submit”>
<p></p>
<div style=”text-align: center; max-width: 222px; width: 100%”>
<p id=”ContactForm1_contact-form-error-message” class=”contact-form-error-message”></p>
<p id=”ContactForm1_contact-form-success-message” class=”contact-form-success-message”></p>
</div>
</form>
</div>
</div>
<div class=”clear”></div>
<span class=”widget-item-control”>
<span class=”item-control blog-admin”>
<a title=”Edit” target=”configContactForm1″ onclick=”return _WidgetManager._PopupConfig(document.getElementById(“ContactForm1″));” href=”//www.blogger.com/rearrange?blogID=8799058979810298021&widgetType=ContactForm&widgetId=ContactForm1&action=editWidget§ionId=sidebar-right-1″ class=”quickedit”>
<img width=”18″ height=”18″ src=”//img1.blogblog.com/img/icon18_wrench_allbkg.png” alt=””>
</a>
</span>
</span>
<div class=”clear”></div>
</div>


0 comments: