TechBow

upcoming smartphones,smartphone unboxing and review,leptops tips and tricks,blogging etc.

How to create partition on computer or laptop running on windows In this tutorial I will show you how to partition on computer hard dri...

How to create partition on computer or laptop running on windows


In this tutorial I will show you how to partition on computer hard drive without using any software. You can do partition on window 10 hard disk, windows 8 hard disc or windows 7 hard disk.

When you buy a new laptop or computer usually they come with only one hard disk partition named as “C”. but we would like to have more than one partition so we can place personal files separate from windows files.

 There could be some hidden partitions on the hard disk such as the "Recovery Partition" and some manufacturer specific partitions for system recovery and tools etc. if your computer came with a single accessible partition, you might want to create more partitions.

Firstly you might want to know what is hard disk partition?
Hard disk partitioning as the name indicates is the process of dividing a hard disk into partitions or logical disks on the same physical hard disk and treat each partition as a separate disk. Each of the partitions on the hard drive is treated by the computer as if they were different physical disk with it's own label.


Let us start with windows 10 first

Windows 10

To create partition in windows 10 follow the steps given below:
  • Right click on this PC and select manage
  • After selecting manage, a pop up will appear where you will see disk management, click on it.
  • Select the disk from which you want to make a partition.
  • Right click the Un-partitioned space in the bottom pane and select New Simple Volume
  • Enter the size in MB and click next and you will get a new partition.

Windows 8 and 8.1

To create a partition in windows 8 or 8.1 fllow the steps given below.
  • Hold the Windows key on your keyboard and press R
  • This will launch the Run the utility. Type diskmgmt.msc inside the text box and press Enter. This will open the Windows Disk Management utility
  • To create unallocated space, you need to shrink your hard drive. When you shrink your hard disk, the remaining space becomes unallocated
  • To do this, right-click your main drive and select Shrink Volume
  • Now you need to enter the amount you want to shrink the hard disk by in megabytes
  • After the Shrink is done, you will then see the region of unallocated space (shaded black). Remember, this space is not yet usable
  • Right-click the region of unallocated space and select New Simple Volume
  • This will launch the New Simple Volume Wizard. This will guide you through the installation process
  • Assign the disk a drive letter. You can choose any drive letter that is not currently in use 
  • Select a file system for the disk. The file system is basically the type of format or foundation"the storage device has. If you plan on installing a Windows OS to the partition select the NTFS file system
  • Name the partition in the Volume Label text box. You can choose any name for your partition 
  • Now click Finish to create the new partition.

WINDOWS 7

To create a partition in windows 7 follow the steps given below:
  • Go to start button and open computer management. Then go to “control panel” then “system and security” after that go to “administrative tools” and then double click on computer management.
  • In the left pane, under Storage, select Disk Management
  • Right-click an unallocated region on your hard disk, and then select New Simple Volume
  • In the New Simple Volume Wizard, select Next
  • Enter the size of the volume you want to create in megabytes (MB) or accept the maximum default size, and then select Next
  • Accept the default drive letter or choose a different drive letter to identify the partition, and then select Next
  • In the Format Partition dialog box, do one of the following:
  1. If you don't want to format the volume right now, select Do not format this volume, and then select Next
  2. To format the volume with the default settings, select Next
  • In the end select Finish and your partition is ready.

how to create partition on computer or laptop,how to create partition on windows


WINDOWS VISTA

To create a partition in VISTA follow the steps given below: 
  • Right Click on Computer and select Manage 
  • From the Disk Management module you will find the disk that holds the partition listed in the gray area of the bottom of the Window
  • Right click on the partition and select Shrink VolumeIt will query for available free space then submit the size that is available to shrink the partition by. Then in an open field it will provide space for you to type the amount you would like to shrink the partition by.
  • Once you have entered the amount you want to shrink the volume by, select Shrink
  • It will take a while for it to shrink that partition, and when it does it will leave Unallocated Space that you can make a new partition out of
  • To make the new partition out of the Unallocated Space, right click on that Space and select New Simple Volume. Follow the wizard in creating the partition size, drive letter, format volume until the process is complete.

This is how you can create new partitions on computer or laptop. I hope this article will help you.

How to Hide,Disable or Remove navigation bar (navbar) from blogger Before we start to learn how to remove navigation bar (navbar) from ...


How to Hide,Disable or Remove navigation bar (navbar) from blogger

Before we start to learn how to remove navigation bar (navbar) from blogger lets talk about navbar.
So what is navbar actually?
In blogger many default templates show navigation bar (navbar) at the top of your blog. You get this navigation bar in blogger by default. But you can remove or hide it manually if you want to. There is no advantages or disadvantages of keeping or removing navbar from blogger. Its just if you want to keep a clean look, you can remove it.
There are mainly three methods to remove blogger navbar.  

First method: from navbar configuration

Step 1: Go to layout section first.
Step 2: Click “edit” on navbar widget. You will be in navbar configuration window.
Step 3: You will see “off” option in the end. Click it and save the changes.
 Hide,Disable or Remove navigation bar (navbar) from blogger

Second method: Using CSS code

Step 1: go to “theme” and click on “customize” and then go to “advance” and click on “Add CSS”.
Step 2: copy the codes given below and paste it in “Add CSS”
#navbar-iframe{
Display:none !important;
}
Step 3: click on “apply to blog” button

Third method: Using Edit Html

Step 1: go to “theme” first then go to “edit Html” and click on “jump to widget” then go to “navbar1”
Step 2: you will see lines given below
<b:section class=’navbar’ id=’navbar’ maxwidgets=’1’ name=’Navbar’
Showaddelement=’no’>
<:widget id=’Navbar1’locked=’true title=’Navbar’ type=’Navbar’>
<b:includable id=’main’> </b:includable>
</b:widget>
</b:section>
Step 3: select all those lines and remove them.
Step 4: in the end click on “save theme”.
Now you should have a blogger page without the navigation bar at the top.
These are three easy methods to hide or remove navigation bar from your blogger page. I hope this article helped you.

How To Create Website Using Blogger In this tutorial we are going to teach you how you can use blogger to create a free website, you ...


How To Create Website Using Blogger

In this tutorial we are going to teach you how you can use blogger to create a free website, you won’t be needed to buy any domain and hosting services. In blogger you get both for free. Blogger is owns by google so you do not have to worry  about any issues. You will get thousands of different themes for free which you can use to give a professional look to your website. Without further a due lets start the tutorial step by step.

STEP 1: LOGIN TO BLOGGER

Firstly visit to https://blogger.com/home and sign in with your Gmail ID and password, if you don’t have an account then you can create it for free by clicking the “sign up” button at the top right corner. Blogger belonged to Google that’s the reason you would be needing an Gmail account for building a website on blogger.
how to create website using blogger,how to create free website

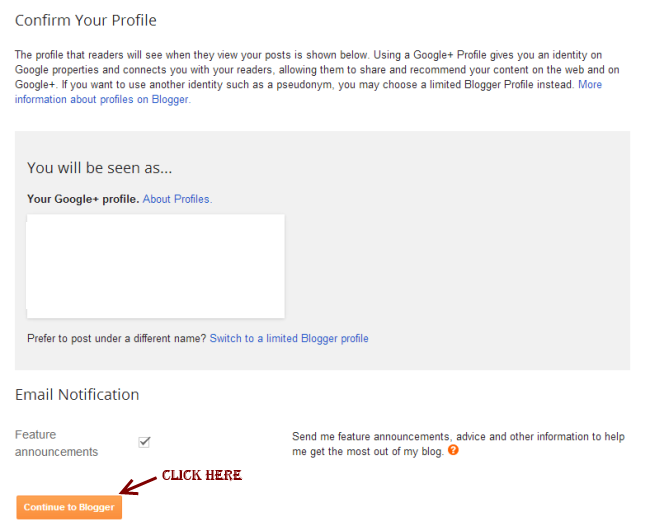
STEP 2: CONFIRM YOUR PROFILE

After you finish logging in with your Gmail credentials, you will see “continue to blogger” in bottom of page, just click the same.
how to create website using blogger,create free website

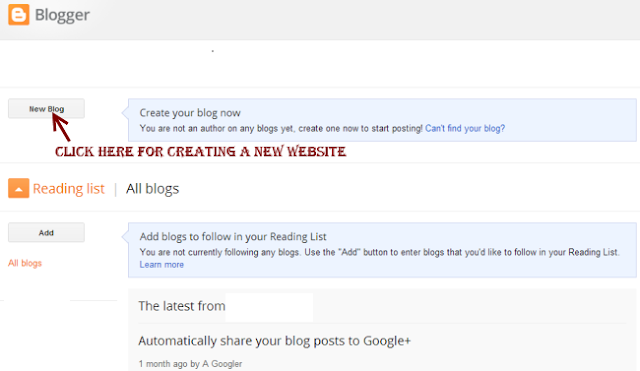
STEP 3: CREATE A NEW BLOG

To create a new website just click on new blog button.
how to create website using blogger,create free website

STEP 4: PROVIDE WEBSITE NAME AND TITLE

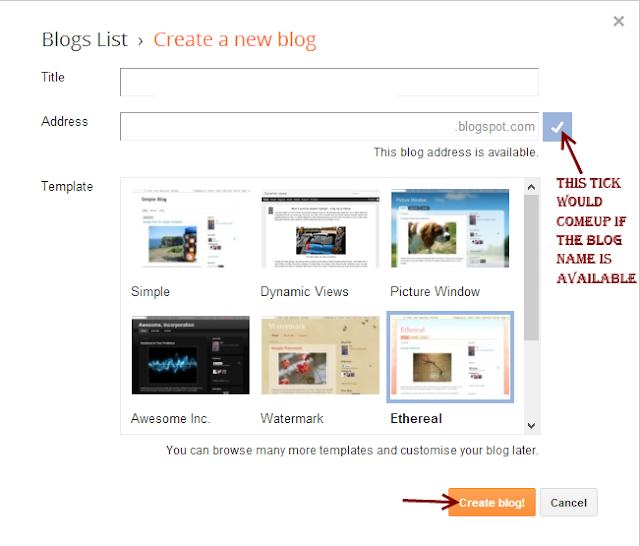
You would need to provide the title and address of your website. You must know that these Domain names are free, therefore they would be already fixed with blogspot,com by default. Bloggeralso provides the option of having custom domain names but we learn how to add custom domain names later on this tutorial.
The domain name must be unique so there are chances that the domain name you want to choose is already registered. In that case you must need to try a different domain name until unless the blue tick gets appeared at the right side of Address field as shown below.
Once it’s done, choose a theme (you can choose any theme at this point, you would be able to change it later at any point of time, we will show you how to do that) and click Create Blog.
how to create website using blogger,create free website


Step 5: Start Blogging

By completing till step 4, you successfully own a website for free. Now, you can start posting posts/articles, click on start blogging.

Step 6: Visit your website

Give your website’s address in the browser and press enter. You would be presented with a website, which you own!!. Initially, you may not like the look and layout but we have not yet finished the tutorial, we will show you every single way to tweak your website, in order to make it look good and professional.

Publish a post/article on blogspot website

Since you have successfully create a website on blogspot, you can now start posting articles on your new website. Refer the below screenshot. Write content, title and hit Publish to publish the post.
When you click publish, it would ask you to share the content on Google+, you may wish to do so as it would become a good source of traffic to your newly created website.

Set the desired permalink structure in Blogspot

You may be wondering what is permalink – It’s a link (Address, which you enter in browser to view your posts) to your post/article
There are two options available when you write a post.

Automatic permalink: 

Blogger would automatically generate the permalink for the current post, based on the title provided in the title section.

Custom Permalink: 

Choose custom permalink in sidebar as shown in the below screenshot and provide the value. Lowers cases words with hyphen(-) in between are the best choices.

Customize your website

You may want to change the look of your website, you can easily do so by changing the theme of the website. You would be presented with a collection of theme. Choose the one, which you like, click on the apply the theme button, provided below each of the theme in library. Alternatively, there are many websites from where you can download the popular and good looking website’s theme for free. We will share some of those website’s in next section.

Download existing theme backup and upload new template to blogger

Go to "My blogs" and click on "Theme", you would find a Backup/Restore button, click on it. In the next screen it would ask you to browse new template or you can download the existing template to the local machine.

find free themes outside Blogger:

If you do not find a suitable website’s theme in Bloggers library then you can get the free themes by searching “free bloggers template” on Google. Select the theme and download zip file from the website. Extract the zip file, in the extract folder you will find a XML file, this is the file you would be needing while uploading the theme to Blogspot.

Upload new theme

You can download the backup of existing theme and for uploading new theme, browse the XML file and click "Upload". It may ask you for widgets, click on "Keep Widgets". 

Change the look of navigation bar

Go to “layout section” from sidebar and click on edit in “Navbar” section. Select the look and style you require and hit save.

Add Favicon to your website

Favicon is a tiny image which you can see at the browser’s tab while opening a particular website. In order to change the default blogspot’s favicon go to layout section and click edit favicon. Choose a square image of size less than 100 KB and upload it. Whenever you do any change in the layout section, do not forget to save arrangement.

Add Gadget to your website

You can add Gadgets to the blog’s sidebar, below navigation menu and in footers. Whenever you click on "Add a Gadget" button in layout section, a popup window would come up where you can browse and add gadgets. Don’t forget to save the settings.

Switch to a Custom domain

Above we have seen how we choose to have a free blogspot domain which was suffixed with blogspot keyword, however if you wish you can purchase a custom domain of your choice and can add it in Settings » Basic. Click on Add a custom domain and give the domain name you have bought.


How To Add Contact Form (Contact Us Page) in Blogger? Contact us page is very important for bloggers who use it as a platform for bus...


How To Add Contact Form (Contact Us Page) in Blogger?

Contact us page is very important for bloggers who use it as a platform for business websites. Firstly it gives a professional look to a website. And it makes visitors readers to contact the owner personally instead of comment section.

Nowadays most of the blogspot bloggers seek the help of third-party site to make a contact us form. But today you are going to learn the official way to add contact us page in Blogger.

I have divided this tutorial in three parts so you can understand it easily.
Firstly we learn how to add contact gadget. Secondly we learn to hide it and in the end we learn to implement the official code in a page.

Part 1 : Addition of Contact Gadget.

To add the contact us gadget follow the instructions given below
Step 1 : firstly visit blogger.com and login into your account  
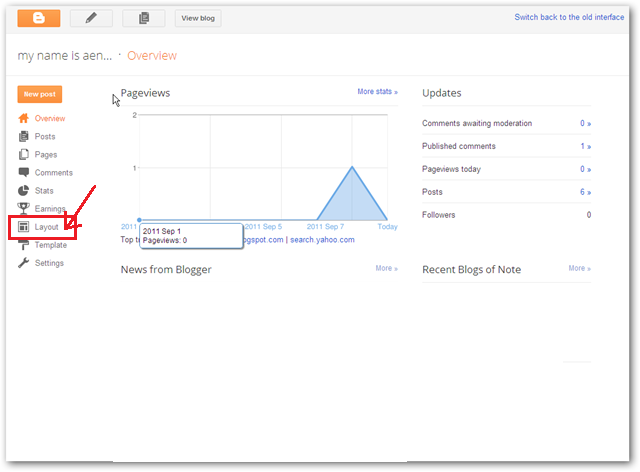
Step 2 : Click on layout from the left sidebar to get an option to add gadgets.
Step 3: you will see “add a gadget” in the main panel on the right side. Clicking on it will bring you to a list of gadgets.
How To Add Contact Form,contact us page


Step 4 : then choose ‘more gadgets’ from the left side. Now you will see contact form. Add it.
How To Add Contact Form,contact us page

Part 2 : Hiding the Gadget

 Now that we have added the contact form to one of the region in the layout, we need to hide it so that it is not visible in the widget area but in a page. To do so follow instruction given below
Step 1 : go to theme section and simply click on edit HTML. You will see whole code of your blog in a large field.

Step 2: search for ]]></b:skin> and place the following code just before it.

#contact form1 {
Display: none !important;
}


How To Add Contact Form,contact us page


Then click on save theme. After that you won’t see contact widget on your blog.

 Part 3 : Displaying contact us on a Blogger page:


Once we have the contact form widget added and hidden, let's create a Blogger contact us page.

Step 1 : From the Blogger Dashboard, click on "Pages" and go to add a new page

Step 2 : Give a title to the page such as "Contact" or  "Contact Us" etc.

Step 3 : Click on HTML button next to COMPOSE to enter in HTML mode

Step 4 : If there are any default code, select all and remove.

 Step 5 : Copy and paste the following code in the HTML text area.

 <div id=”custom_ContactForm1″ class=”widget ContactForm”>
<div class=”contact-form-widget”>
<p>Get in touch with us by filling out the form below.</p>
<div class=”form”>
<form name=”contact-form”>
<p></p>
Name
<br>
<input type=”text” value=”” size=”30″ name=”name” id=”ContactForm1_contact-form-name” class=”contact-form-name”>
<p></p>
Email
<span style=”font-weight: bolder;”>*</span>
<br>
<input type=”text” value=”” size=”30″ name=”email” id=”ContactForm1_contact-form-email” class=”contact-form-email”>
<p></p>
Message
<span style=”font-weight: bolder;”>*</span>
<br>
<textarea rows=”5″ name=”email-message” id=”ContactForm1_contact-form-email-message” cols=”25″ class=”contact-form-email-message”></textarea>
<p></p>
<input type=”button” value=”Send” id=”ContactForm1_contact-form-submit” class=”contact-form-button contact-form-button-submit”>
<p></p>
<div style=”text-align: center; max-width: 222px; width: 100%”>
<p id=”ContactForm1_contact-form-error-message” class=”contact-form-error-message”></p>
<p id=”ContactForm1_contact-form-success-message” class=”contact-form-success-message”></p>
</div>
</form>
</div>
</div>
<div class=”clear”></div>
<span class=”widget-item-control”>
<span class=”item-control blog-admin”>
<a title=”Edit” target=”configContactForm1″ onclick=”return _WidgetManager._PopupConfig(document.getElementById(“ContactForm1″));” href=”//www.blogger.com/rearrange?blogID=8799058979810298021&widgetType=ContactForm&widgetId=ContactForm1&action=editWidget&sectionId=sidebar-right-1″ class=”quickedit”>
<img width=”18″ height=”18″ src=”//img1.blogblog.com/img/icon18_wrench_allbkg.png” alt=””>
</a>
</span>
</span>
<div class=”clear”></div>
</div>